Anonymous blockchain wallet

August 30, 2014

First hide your ip and MAC address this can be done using the latest version of tails os.

Second log onto the internet go to blockchain.info

Click on wallet

Click on start a new wallet

Put in and confirm your password

Now copy down or print out the wallet recovery Mneomonic do not save it to your computer.

If you click print it will bring up a paper wallet with the Mneomonic on it you can print but once you close that page you cannot reopen it.
You can save it but I do not recommend that as it gives any hacker or any one who has physical access to your computer, full access to this wallet. The only exception is if you password protect that file, which still may be risky. No to mention it ties this account to you if it is ever found or cracked.

The complete beginners guide to creating a secure paper wallet for crypto currencies, from beginning to end.

July 19, 2014

Step one

The very first thing you need is a trusted Linux live CD distribution. This means that the Linux operating system will run directly off the CD and not use your hard drive.

Here is a link of all the known live CDs
http://en.wikipedia.org/wiki/List_of_live_CDs

I recommend the UBUNTU distribution it is secure and very user friendly.
You can down load it at:
http://www.ubuntu.com/download/desktop
Always download the latest LTS desktop version. Right now that is 14.04 LTS
LTS stands for LONG TERM SUPPORT and they are usually the most stable though any Linux is more stable than windows.
Do not download the Server and the ALT ISO images because they are not set up with a live boot option.
If you have problems downloading from the web link, use a Torrent program like Transmission (Linux) or Utorrent (windows)
which you can get here:
for windows
http://www.utorrent.com/downloads/complete/os/win/track/stable

for Linux and Mac
http://www.transmissionbt.com/download/
just select the appropriate

Once you have installed the Torrent Program (utorrent or Transmisson)
choose a link below to download Ubuntu.

This one works on both 32 bit and 64 bit processors.
http://releases.ubuntu.com/14.04/ubuntu-14.04-desktop-i386.iso.torrent

This one works only on 64 bit processors (most newer computers)
http://releases.ubuntu.com/14.04/ubuntu-14.04-desktop-amd64.iso.torrent

Open the torrent link and it will ask for permission to start the torrent program to start the download.

This is the recommended method, because torrents check the integrity of the files and insure a complete and accurate download. It is also a quicker method because it is pulling from many different computers instead of just one download site. I used torrent and each of these took about 15-20 minutes on my slow internet connection.

OK this is great now you should have the ISO file downloaded to your hard drive. The next step is to burn the file to a DVD, this can be a little tricky if you have never burned an ISO to a disk before, because its a little different than a usual file or music burn and some CD burning programs do not support burning ISO images. In Windows I use CD burner xp. You can download it at:
https://cdburnerxp.se/en/download
You also need to make sure you have windows media player 9 or above installed first.
Then open cdburnerxp and click on “burn ISO image”.
Follow the prompts and select the ISO image you previously downloaded.
Check:
dvd high compatibility (this one gives a better burn)
finalize disk (this one insures that nothing else can be added to the disk once it has been created)
eject disk after burning (just so you know that it is done)
verify data after burning (this one checks to make sure its all there)

Now you should have a properly made Ubuntu live boot CD

The next step it to change the bios boot order.
For this you need to power off your computer (restarting is not always enough)
Press the power button to restart it and depending on your computer you will need to press a key many computers flash in the upper or lower portion of the boot screen the keys to press and their functions. If it is up long enough to read and respond then you can easily enter the bios, but many other computers do not, so you may have to do a web search for your computer to find out how to change the boot order.

“ The most common way to enter the BIOS is to press the DELETE key when the computer is first booted(this seems to be becoming standard). On other systems it could be a different key, or combination of keys like ESC, F1, F2, F10, F12, Ctrl-Esc, Alt-Esc, Ctrl-Alt-Esc, Ctrl-Alt-Enter, Ins or even others. You might have to press, press and hold, or press multiple times. The best way to find out the details of that is to look in the users manual or search the manufactures website.” (copied from Ubuntu web site)

On my computer I can change it permanently or do a one time boot to the drive of my choice, I set up my computer to first boot to a CD drive then to a USB drive then to the hard drive if nothing else is there but, I am not the normal user, so for most users a one time CD boot would be the best option.

Windows 8 machines are a little more complicated on this, but you can look here for the latest update on it.
https://help.ubuntu.com/community/BootFromCD
Copied from their site:
All Windows 8 machines come with UEFI (Unified Extensible Firmware Interface), a new industry-standard replacement for BIOS. UEFI will handle larger partitions than BIOS could, but it also has a feature called Secure Boot to prevent you from “accidentally” installing some other operating system, such as Ubuntu Linux. At present (January 2014), you must disable Secure Boot and enable Legacy Support and CD ROM boot as well as changing the boot order. Just how you do this may vary from one manufacturer to another. Here is a procedure which worked on an HP Pavilion 15 Notebook.
Turn off the computer. Put in the bootable DVD. Turn on and tap Esc about twice a second until a screen comes up with these items:
Starting Menu
F1 System information
F2 System diagnostics
F9 Boot Device Options
F10 BIOS Setup

Enter – Continue setup
Press F10 and enter the “BIOS” setup, really the UEFI setup. Across the top are four menu items. Use the right arrow to higlight the third one, “System Configuration”. A screen offers you five options; use the down arrow to select the fifth, “Boot options” and press enter.
Use the down arrow to move down the list and the F5 or F6 key to change items as necessary. You should set:
CD-ROM Boot
Internal Network Adapter Boot
Legacy Support
Secure Boot
Under the UEFI boot order, select the “Internal CD/DVD ROM Drive” and use the up-arrow key to move it to the top of the list; put “OS boot manager” in second position.
Under “Legacy Boot Order”, put “Internal CD/DVD ROM Drive” on top and “Notebook Hard Drive” in second position.
Press F10 to Save and Exit. The computer will boot — you guessed it — Windows 8! Turn it off, wait 15 seconds, turn it on, and again press Esc twice a second. You will at some point get a screen that tells you that someone has modified the UEFI options. If you really want them modified, then you must copy a number shown on the screen into a box, also shown on the screen. Do so, and follow any other instructions on the screen. You now have a good chance of booting Ubuntu.
It is a good idea to keep some notes on what you are doing. It is hard to avoid the impression that some influential company wants to make it complicated for you to start enjoying Linux.
Now you should make sure that you have a dumb printer plugged in to your computer directly do not use a smart or wifi printer. (we will need to disconnect for the Internet to safely generate the codes for the paper wallets and smart printers can save and redistribute printed pages. )This way Ubuntu will most likely find and install the drivers needed for your printer during the boot up. A few printers just do not work easily with Ubuntu and you will have to find the right driver for them, like the laser brother printer I use at work.

It is also best to use a laser printer as ink jet printers fade and run when exposed to moisture, like what we have here in Tennessee, but if all you have an ink jet printer you can place the wallets in a plastic zip lock bag. You can also take a picture of them but never allow that picture access to a computer that will ever be online including any cell phone, store those photos securely.

OK, Now that we have over come those hurdles, We can place the Live Ubuntu CD in the drive and restart your computer. This time it should boot directly into Ubuntu (If you are using a one time CD boot option select it on this start up) give it a few minutes to load. Live CD do take a little while to load and run, so be patient.
It should give you the option to either try Ubuntu or install Ubuntu. For this purpose we do not want to install Ubuntu we want to use it on a live disk which can not be altered. So select try Ubuntu.
Then connect to the internet via cat5 or wifi and make sure your printer is working correctly, just open any web page like Google and print it to test your printer. (Best to use a dumb Laser printer) If all prints well then its time to go to the paper wallet site. I use card stock paper to print out my paper wallets it not only holds up better it also is harder to see through when held up to the light.

There are sevearal sites you can go to like:
BitAddress.org,
BitcoinPaperWallet.com
OfflineAddress.com
SafePaperWallet.com

Lets use bitcoinpaperwallet.com for our example
https://bitcoinpaperwallet.com/
Also take the time to read what they say here, its loaded with great information.
Then in the upper right hand corner click on generate keys and print paper wallets.
Now disconnect from the Internet immediately.
You now have a safe secure OS and even if you did happen to download a spy-ware it will get wiped out as soon as you reboot, do not reconnect to the Internet until after shutdown your computer.

Now follow the directions on creating your paper wallets and print them out. What I like to do is to print 2 copies of each paper wallet, one to keep somewhere safe and the other to use the key to load the wallet, I number them, so the two alike will have the same number, its just easier to keep up with that way. Then I cut off the private key of one copy and burn it. (yes burn shredding is not enough.) The copies with the private keys I place in a very safe place like a safe deposit box in a bank or on another equally secure location. (I also make sure that there are no cameras around during my creation of these wallets as one picture is enough to wipe them out.)

So now I have 20+ paper wallets in a safe deposit box and a stack of public keys (only) in my wallet so I can easily make deposits to those wallets, but if I am robbed at least my Bitcoin is safe.

Another thing that I have done when I use to carry the paper wallets with me is to print a dark and broken up picture on the back of each wallet so that it would not be easy to hold them up to the light and see through them. Then I folded the private key up so that it could not easily be seen. When loading by another person. Note I never folded the wallet across the QR codes. Then I realized the risk of theft and chose to separate private and public keys, so they could not be stolen.

OK now that you have your paper wallets in hand,
Wipe all data

Turn off your computer and this immediately erases all info from your live boot session.
Then Turn off your printer but, first ensure that the printer does not store anything and if it does make sure that you erase it before you do anything else, most printers clear their memory as soon as they print a page.

Reminder If the printer or your computer is on line or connected to another computer or any network that is on line, or off line during this process your wallets may have been compromised already.

If you follow these instructions you do not have to worry about the security of your paper wallets and taking short cuts will only increase the risk.

For creating these secure paper wallets its OK to be overly paranoid, but once you have them you can take great comfort in the safety of using them.

Here is another idea If you can send an encrypted picture in an email to a friend on the other side of the world you can send them a paper walled loaded or unloaded, it does not have to be transferred to them they just need the encryption code to open the picture and access the wallet.

Now How to move Bitcoin from the Paper wallet to an online or computer wallet.
This can be done through blockchain.info and a few other sites.

If you find this helpful please send some bitcoin to:
13UkM7G9wGKJtBw78QPV5vswEkZWsxkdgt
For got all about this account

November 19, 2012

WOW so apparently someone attempted to hack this account, and word press sent me a notice so I finally after all these years went back to it and logged in.


so here I am again.

Married now To the most amazing woman I could have ever hoped for. LIfe is good,


More adventures just around the corner.

The complete beginners guide to creating a secure paper wallet for crypto currencies, from beginning to end.

January 15, 2008

The complete beginners guide to creating a secure paper wallet for crypto currencies, from beginning to end.

Step one

The very first thing you need is a trusted Linux live CD distribution. This means that the Linux operating system will run directly off the CD and not use your hard drive.

Here is a link of all the known live CDs
http://en.wikipedia.org/wiki/List_of_live_CDs

I recommend the UBUNTU distribution it is secure and very user friendly.
You can down load it at:
http://www.ubuntu.com/download/desktop
Always download the latest LTS desktop version. Right now that is 14.04 LTS
LTS stands for LONG TERM SUPPORT and they are usually the most stable though any Linux is more stable than windows.
Do not download the Server and the ALT ISO images because they are not set up with a live boot option.
If you have problems downloading from the web link, use a Torrent program like Transmission (Linux) or Utorrent (windows)
which you can get here:
for windows
http://www.utorrent.com/downloads/complete/os/win/track/stable

for Linux and Mac
http://www.transmissionbt.com/download/
just select the appropriate

Once you have installed the Torrent Program (utorrent or Transmisson)
choose a link below to download Ubuntu.

This one works on both 32 bit and 64 bit processors.
http://releases.ubuntu.com/14.04/ubuntu-14.04-desktop-i386.iso.torrent

This one works only on 64 bit processors (most newer computers)
http://releases.ubuntu.com/14.04/ubuntu-14.04-desktop-amd64.iso.torrent

Open the torrent link and it will ask for permission to start the torrent program to start the download.

This is the recommended method, because torrents check the integrity of the files and insure a complete and accurate download. It is also a quicker method because it is pulling from many different computers instead of just one download site. I used torrent and each of these took about 15-20 minutes on my slow internet connection.

OK this is great now you should have the ISO file downloaded to your hard drive. The next step is to burn the file to a DVD, this can be a little tricky if you have never burned an ISO to a disk before, because its a little different than a usual file or music burn and some CD burning programs do not support burning ISO images. In Windows I use CD burner xp. You can download it at:
https://cdburnerxp.se/en/download
You also need to make sure you have windows media player 9 or above installed first.
Then open cdburnerxp and click on “burn ISO image”.
Follow the prompts and select the ISO image you previously downloaded.
Check:
dvd high compatibility (this one gives a better burn)
finalize disk (this one insures that nothing else can be added to the disk once it has been created)
eject disk after burning (just so you know that it is done)
verify data after burning (this one checks to make sure its all there)

Now you should have a properly made Ubuntu live boot CD

The next step it to change the bios boot order.
For this you need to power off your computer (restarting is not always enough)
Press the power button to restart it and depending on your computer you will need to press a key many computers flash in the upper or lower portion of the boot screen the keys to press and their functions. If it is up long enough to read and respond then you can easily enter the bios, but many other computers do not, so you may have to do a web search for your computer to find out how to change the boot order.

“ The most common way to enter the BIOS is to press the DELETE key when the computer is first booted(this seems to be becoming standard). On other systems it could be a different key, or combination of keys like ESC, F1, F2, F10, F12, Ctrl-Esc, Alt-Esc, Ctrl-Alt-Esc, Ctrl-Alt-Enter, Ins or even others. You might have to press, press and hold, or press multiple times. The best way to find out the details of that is to look in the users manual or search the manufactures website.” (copied from Ubuntu web site)

On my computer I can change it permanently or do a one time boot to the drive of my choice, I set up my computer to first boot to a CD drive then to a USB drive then to the hard drive if nothing else is there but, I am not the normal user, so for most users a one time CD boot would be the best option.

Windows 8 machines are a little more complicated on this, but you can look here for the latest update on it.
https://help.ubuntu.com/community/BootFromCD
Copied from their site:
All Windows 8 machines come with UEFI (Unified Extensible Firmware Interface), a new industry-standard replacement for BIOS. UEFI will handle larger partitions than BIOS could, but it also has a feature called Secure Boot to prevent you from “accidentally” installing some other operating system, such as Ubuntu Linux. At present (January 2014), you must disable Secure Boot and enable Legacy Support and CD ROM boot as well as changing the boot order. Just how you do this may vary from one manufacturer to another. Here is a procedure which worked on an HP Pavilion 15 Notebook.
Turn off the computer. Put in the bootable DVD. Turn on and tap Esc about twice a second until a screen comes up with these items:
Starting Menu
F1 System information
F2 System diagnostics
F9 Boot Device Options
F10 BIOS Setup

Enter – Continue setup
Press F10 and enter the “BIOS” setup, really the UEFI setup. Across the top are four menu items. Use the right arrow to higlight the third one, “System Configuration”. A screen offers you five options; use the down arrow to select the fifth, “Boot options” and press enter.
Use the down arrow to move down the list and the F5 or F6 key to change items as necessary. You should set:
CD-ROM Boot
Internal Network Adapter Boot
Legacy Support
Secure Boot
Under the UEFI boot order, select the “Internal CD/DVD ROM Drive” and use the up-arrow key to move it to the top of the list; put “OS boot manager” in second position.
Under “Legacy Boot Order”, put “Internal CD/DVD ROM Drive” on top and “Notebook Hard Drive” in second position.
Press F10 to Save and Exit. The computer will boot — you guessed it — Windows 8! Turn it off, wait 15 seconds, turn it on, and again press Esc twice a second. You will at some point get a screen that tells you that someone has modified the UEFI options. If you really want them modified, then you must copy a number shown on the screen into a box, also shown on the screen. Do so, and follow any other instructions on the screen. You now have a good chance of booting Ubuntu.
It is a good idea to keep some notes on what you are doing. It is hard to avoid the impression that some influential company wants to make it complicated for you to start enjoying Linux.
Now you should make sure that you have a dumb printer plugged in to your computer directly do not use a smart or wifi printer. (we will need to disconnect for the Internet to safely generate the codes for the paper wallets and smart printers can save and redistribute printed pages. )This way Ubuntu will most likely find and install the drivers needed for your printer during the boot up. A few printers just do not work easily with Ubuntu and you will have to find the right driver for them, like the laser brother printer I use at work.

It is also best to use a laser printer as ink jet printers fade and run when exposed to moisture, like what we have here in Tennessee, but if all you have an ink jet printer you can place the wallets in a plastic zip lock bag. You can also take a picture of them but never allow that picture access to a computer that will ever be online including any cell phone, store those photos securely.

OK, Now that we have over come those hurdles, We can place the Live Ubuntu CD in the drive and restart your computer. This time it should boot directly into Ubuntu (If you are using a one time CD boot option select it on this start up) give it a few minutes to load. Live CD do take a little while to load and run, so be patient.
It should give you the option to either try Ubuntu or install Ubuntu. For this purpose we do not want to install Ubuntu we want to use it on a live disk which can not be altered. So select try Ubuntu.
Then connect to the internet via cat5 or wifi and make sure your printer is working correctly, just open any web page like Google and print it to test your printer. (Best to use a dumb Laser printer) If all prints well then its time to go to the paper wallet site. I use card stock paper to print out my paper wallets it not only holds up better it also is harder to see through when held up to the light.

There are sevearal sites you can go to like:
BitAddress.org,
BitcoinPaperWallet.com
OfflineAddress.com
SafePaperWallet.com

Lets use bitcoinpaperwallet.com for our example
https://bitcoinpaperwallet.com/
Also take the time to read what they say here, its loaded with great information.
Then in the upper right hand corner click on generate keys and print paper wallets.
Now disconnect from the Internet immediately.
You now have a safe secure OS and even if you did happen to download a spy-ware it will get wiped out as soon as you reboot, do not reconnect to the Internet until after shutdown your computer.

Now follow the directions on creating your paper wallets and print them out. What I like to do is to print 2 copies of each paper wallet, one to keep somewhere safe and the other to use the key to load the wallet, I number them, so the two alike will have the same number, its just easier to keep up with that way. Then I cut off the private key of one copy and burn it. (yes burn shredding is not enough.) The copies with the private keys I place in a very safe place like a safe deposit box in a bank or on another equally secure location. (I also make sure that there are no cameras around during my creation of these wallets as one picture is enough to wipe them out.)

So now I have 20+ paper wallets in a safe deposit box and a stack of public keys (only) in my wallet so I can easily make deposits to those wallets, but if I am robbed at least my Bitcoin is safe.

Another thing that I have done when I use to carry the paper wallets with me is to print a dark and broken up picture on the back of each wallet so that it would not be easy to hold them up to the light and see through them. Then I folded the private key up so that it could not easily be seen. When loading by another person. Note I never folded the wallet across the QR codes. Then I realized the risk of theft and chose to separate private and public keys, so they could not be stolen.

OK now that you have your paper wallets in hand,
Wipe all data

Turn off your computer and this immediately erases all info from your live boot session.
Then Turn off your printer but, first ensure that the printer does not store anything and if it does make sure that you erase it before you do anything else, most printers clear their memory as soon as they print a page.

Reminder If the printer or your computer is on line or connected to another computer or any network that is on line, or off line during this process your wallets may have been compromised already.

If you follow these instructions you do not have to worry about the security of your paper wallets and taking short cuts will only increase the risk.

For creating these secure paper wallets its OK to be overly paranoid, but once you have them you can take great comfort in the safety of using them.

Here is another idea If you can send an encrypted picture in an email to a friend on the other side of the world you can send them a paper walled loaded or unloaded, it does not have to be transferred to them they just need the encryption code to open the picture and access the wallet.

Now How to move Bitcoin from the Paper wallet to an online or computer wallet.
This can be done through blockchain.info and a few other sites.

If you find this helpful please send some bitcoin to:
13UkM7G9wGKJtBw78QPV5vswEkZWsxkdgt
Tutorial for bitcoin wallet iPhone

January 15, 2008

Step 1
Open App Store on your iPhone.
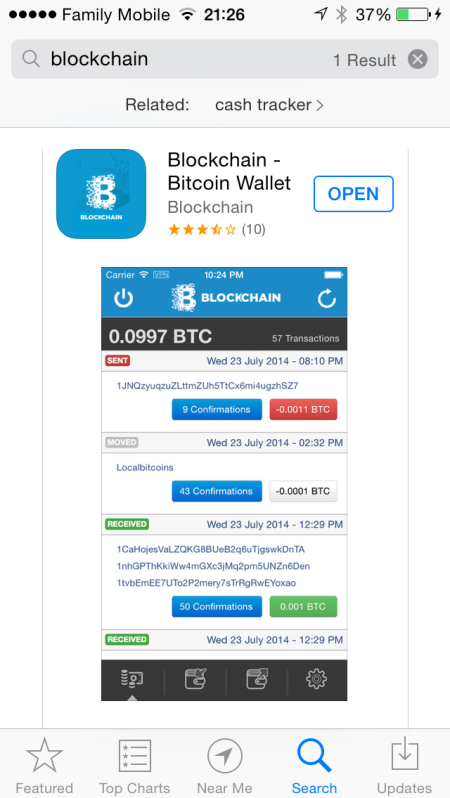
Search for: blockchain

And click on “+FREE” to download the app. (I have already downloaded it but it’s in the same place you now see OPEN in my screen shot.

Once it downloads click on open or go to the app icon and click on it to open it.

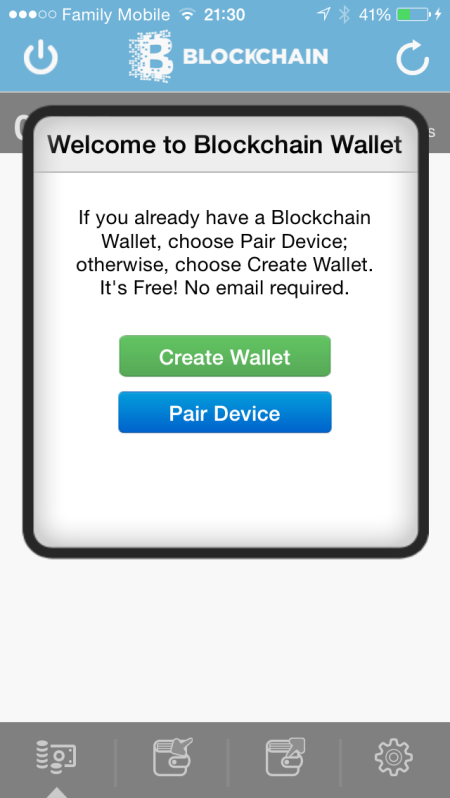
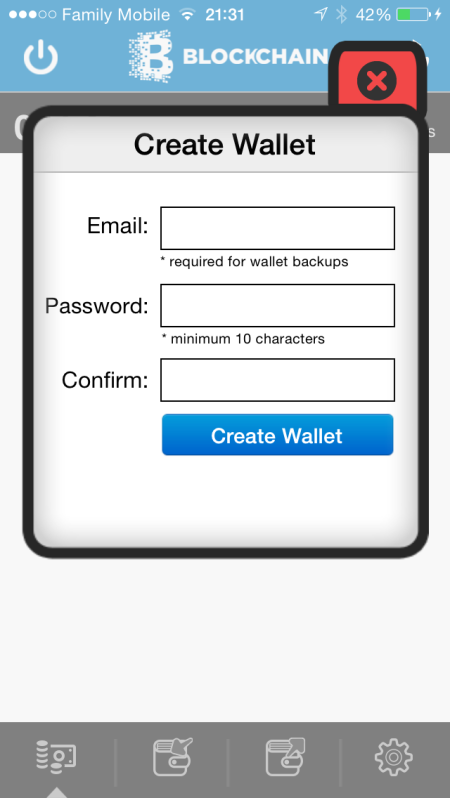
Now click on Create Wallet.

Now fill in your e-mail and password.

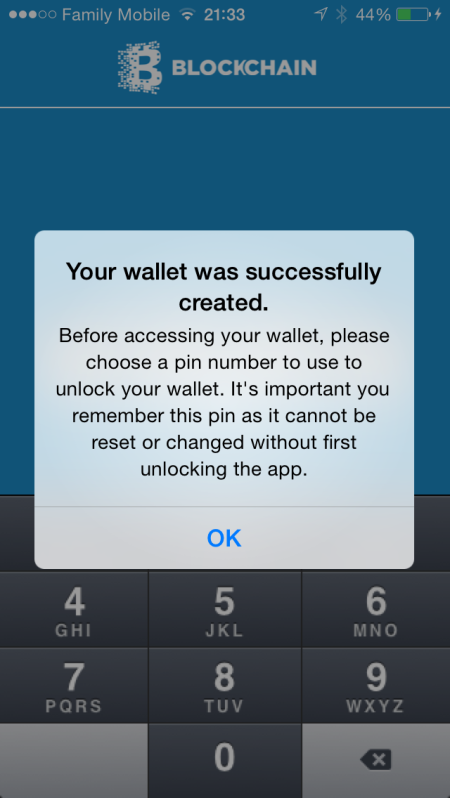
Now select a 4 digit pin

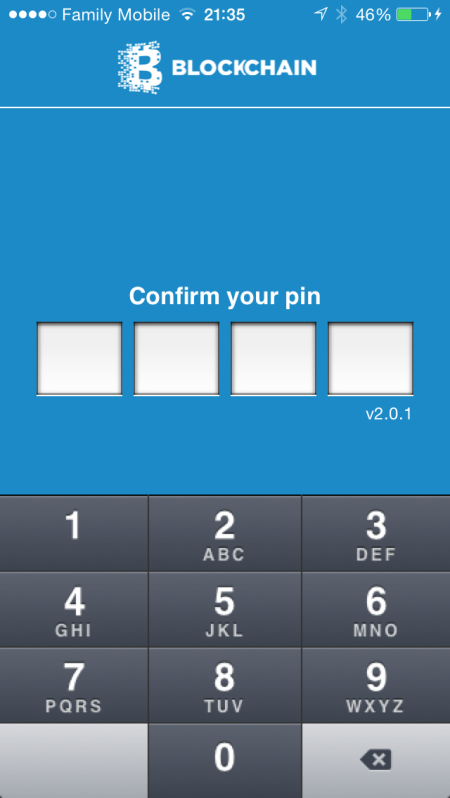
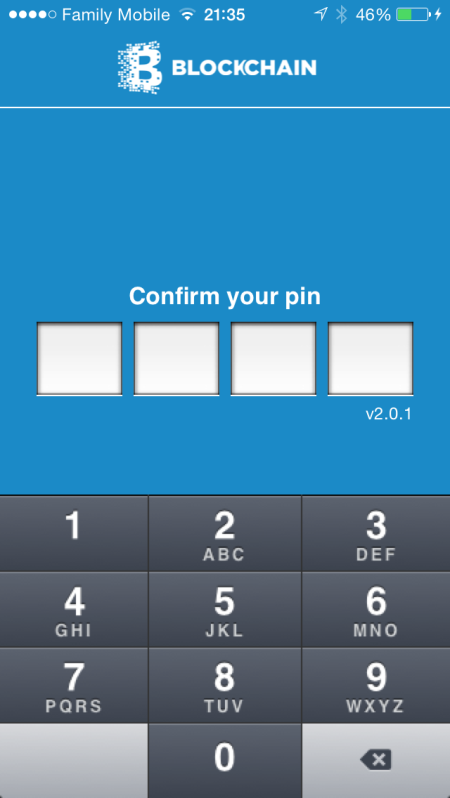
Now confirm your 4 digit pin

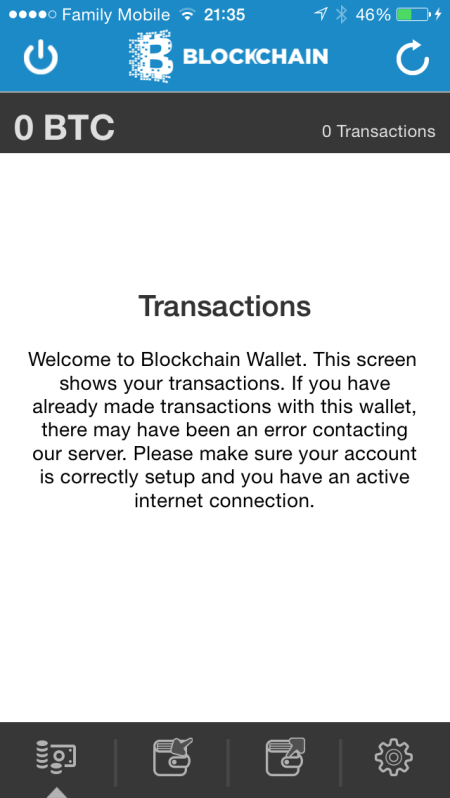
You now have access to your new wallet on your iPhone, iPad, iPod, iwhatevercomesnext…

Optional steps
Now you want to check your email and verify your email address

You may also want to link your phone number and set text and email notifications.

If you found this helpful please donate to:
196vx6wcnonYPDDcN8soAGPnxQ9xCKaYgC

IMG_3623.PNG

IMG_3625.PNG

IMG_3627.PNG

IMG_3624.PNG

IMG_3626.PNG

IMG_3628.PNG

IMG_3627-0.PNG

Now that you have your wallet you need to increase it’s security by adding a double password, two factor authentication and printing the Password Mnemonic for each wallet you set up. Without this there is no way anyone can help recover a forgotten password. When you change your passwords your mnemonic will also change.

Never screen shot or save these on any computer, camera, phone or connected digital device. The safest thing to do is to print these on a laser printer and store them some where safe.

First you need log into your account at blockchain.info from your computer
not from your mobile device.

Do this by going to blockchain.info and then click on wallet in the top right.

Next click on Login Now

Type in your wallet identifier or alias and your password

Next you need to click on account setting on the right. Also notice the back up sections under account settings

You may need to disable pop up blocker for this site as I did.

Now you will see a not about sensitive data. This is the time to check to make sure you are in a private place with no cameras security or personal or hidden… Absolutely no cameras or nosy bystanders.

Once you are sure it’s safe click ok.

The first page you see is the personal page. Fill in email, alias, and phone number, then verify your email by clicking on the link they send you and verify your phone number by putting in the code they text you.

Once this is done click on general and you will see a page like this:

On this page you can enable automatic email back ups but if you do this I highly recommend you secure your email address with two factor authentication. Check with your email provider for directions on this. This can be very helpful if you ever lose your pass words.

Now click on notifications and make sure email and SMS notifications are checked if you want notifications of your transactions. You can also select when the confirmation is sent based on number of confirmations.

Now click on passwords
You need to enable double encryption and set a second password different from the first. Also don’t forget to use password hints that only you will understand.

Next click on show / hide password Mnemonic and print or write down those words exactly as you see them. This is the only way to recover a lost password. Now store that in a safe secure place like a safe deposit box that no one knows you have.

Now click on security and under two factor authentication and select an option I choose Google Authenticator. For this option down load the google authenticator app from the App Store open app. Click in the upper right corner and select the plus then scan barcode and scan the code from the web page. Now put in the code from your phone and your set up.

You will need a number generated from this app every time you want to log in to your account.

Once you set this up they may also send you an email every time you try to log in with a link that allows you to log on using this extra security.

You have the option of backing up in your browser ( I don’t do this because others have access to my computer)

You also should set up a secret phrase to help recover a wallet identifier if you ever loose it.

You can use the option to require authentication for every log in or remember it In case you log off and right back on.

You can block tor ip addresses

You also can restrict access to just one IP address this would be good for some one who’s ip address does not change (static)
I use several different mobile internet services so this would not work for me. Mobile internet uses a dynamic (changing) IP address.

Now click on logging and you have the option of logging actions you increase security with this option but you lose some privacy.

Now click on devices
If you have not already set up your account on your phone with the blockchain app you can do it easily here. Just open the app on your phone and scan the code that is displayed on your computer after you out in your pass word. This code will only show for a few seconds so be ready to scan it with your phone.

Now how to Backup your wallet

Go back to Wallet Home and on the right side towards the bottom you will see Backup you have 5 options
Download
Dropbox
Google Drive
Email
Paper

For download:
Save this file to a thumb drive or other secure media or save it in an encrypted folder.

For email:
just click and it sends the back up to your email. You also must enable two factor authentication for your email account if you use this option.

For paper
Click paper and it will open a page with your paper wallet for this account. Once this appears immediately print this and close the page do not save a copy to your computer and store the paper wallet in a safe secure place.

Google drive and Dropbox I do not recommend because they store the back up online. This could give a hacker access without your knowledge

A

January 13, 2008

A

WELL I guess I should post today since I hav record visits to this blog today

January 2, 2008

This is a wonderful way to start out a new year with record hits!!!

Thank you all

FYI

I am turning back to GOD so you may notice that I hopefully will be acting better and treating those in my life much better, though I do not think that I every really treated them that bad with exception of a few women namely my sons mom and an old GF in Seattle who is forever gone from my life.

on my my space i am posting what I learn in the bible as I read it HOpefully daily I also will post some of my short comings and open up to my readers. I do not seek to teach or preach just to share what I am learning as I learn, actually the bible makes it clear that If my family if messed up that i should not teach and preach. So if MY family life ever get straightened out then i might consider teaching or preaching, but at this time I do not want to be held to those high standards, I know I fail miserably.  right now I just seek to help my family and hopefully God will help me.

To all you wonderful blessings (people and readers) Seek God with your whole heart and he will seek you.

blog

December 21, 2007

<div id=”simpleology_blog_65fdef132456c08947a7b9244368eafc”><p>I’m evaluating a <a href=”http://www.simpleology.com/training/blogging”>multi-media course on blogging</a> from the folks at Simpleology.  For a while, they’re letting you <b><a href=”http://www.simpleology.com/training/blogging”>snag it for free</a></b> if you post about it on your blog.</p><p>It covers:</p><ul><li>The best blogging techniques.</li><li>How to get traffic to your blog.</li><li>How to turn your blog into money.</li></ul><p>I’ll let you know what I think once I’ve had a chance to check it out. Meanwhile, go grab yours while it’s still free.</p></div>

Good evening all

December 8, 2007

Out hunting for another great idea, just spent the last week studying all i could on this newly released marketing system. Yeah I know, what you all think, (“You Got sucked in to that, I thought you were far more brilliant than to allow your self to get suckered in to something like that.”) and I bet you are thinking that I just got ripped off!!!

Well Im most cases I would agree, but not only has this come from a very reputable, source, they Have proof that their system works, and they are standing behind their product.

Check it out at Nitroblueprint.com

The same guy that made Mystery “the pick up artist” a multi millionaire, is the one who  gave me the heads up on this one, now this is right after he used this Marketing concept to make Mystery wealthy.

Not only that there are loads of others as well in many different fields.

ON a more personal note I am sick today I think it is the flue or something similar. I ahve been down for 3 days and just studying all I can about this.

I will keep you all informed as I progress.

Black Sheep

November 23, 2007

IT seems that every family that has had a black sheep in the family must always maintain a black sheep or else the family does not continue to function on their misguided assumptions and have to admit that they were wrong. Which nobody likes to do.

It looks like I am the new black sheep of the family.